10 Ways to Maximize your Living Space

Many of us who live in small confined rooms know the struggles of finding space to put our stuff. For the people looking to tidy up their house, the students in dorms, the studio apartment owners, and persons who are forced to keep everything in one room, Dave’s Projects is here to help. In no particular order, here are 10 ways to maximize your living space (with amazon links).

1. Wall Mount Shelves

Wall mountable shelves are a great cost-effective way to maximize your living space. Particularly because it frees up floor space for other things. One re-occurring theme you will notice in this post is increasing floor real estate by mounting. Wall mountable shelves come in a wide variety of designs and can be as cheap or expensive as you want. But for the added real estate you’re getting in return it is more than worth it.

Amazon:

2. Surface Mounting Cables

cable clutter before and after

Cable clutter from all your electronics is not only unsighly but wastes precious floor space. Overtime this mess is generated by running various internet cables, chargers, phone lines, etc. along the floor. A great way this can be remedied is by surface mounting these cables along the wall. See my first blog post to learn how to do this yourself.

3. Door Hanging Hooks

excellent-hanging-wall-hooks-perfect-ideas

The design simplicity and effectiveness of the door hanging hooks are second only to a bicycle. All it requires is a door to support it and it can significantly increase your wardrobe space without a actually getting a wardrobe.

Amazon:

4. Storage Crates

amazing-of-plastic-storage-crates-storage-containers-plastic-storage-containers-storage-bins

If you’re the type of person with a whole ton of junk but you can’t throw them out because they hold some sentimental value or otherwise, storage crates may be the solution for you. They typically have a fair amount of storage space and best of all they are stackable, meaning more floor real estate again.

Amazon:

5. Sofa bed

sofa bed

Here’s a timeless classic in the efficient furniture world. The name speaks for itself. A couch for guests in the day and a bed by night. The definition of killing two birds with one stone.

Amazon:

6. Bed/Dresser

bed dresser2

Continuing the bed designs, here we have another hybrid type bed that does as the name suggests. This one you probably won’t see at your nearest furniture store however, if you know a skilled carpenter you might have a shot at building one.

7. Inflatable Mattress

air bed

Imagine you have a two bed room apartment. One room dedicated for your bedroom, but then the next room you want as a storage room but you also need a room when family or friends decide to stay the night. Why not do both then! The inflatable mattress is the perfect solution for obvious reasons. When not in use it can be stored in a corner somewhere, then when your guest is over just air that sucker up and boom you’re good to go!

Amazon:

8. Hanging Shoes Bag

shoes hanger

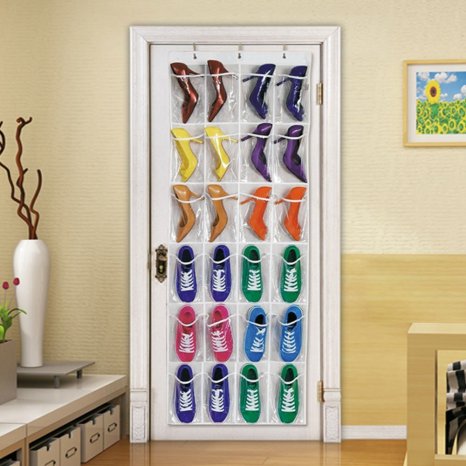
This is similar to the aforementioned door hanging hooks (#3); except instead of hanging up clothes this is for hanging up shoes. The same theory applies to this.

Amazon:

9. Vacuum Storage Bags

vacuum storage 2

This is the traveller’s best friend. With this you can pack your suitcase as efficiently as a Jamaican parent coming back from ‘farin’ bringing back goodies. Just know the increase space afforded means more weight when when you finish packing.


Amazon:


10. Under Staircase Storage

hqdefault

Think back to where Harry Potter used to reside before going to Hogwarts. His awful foster parents locked him up in a little room below their staircase. As in-humane as this was to lock up a human in such a confined space, its an excellent space saving design for a house.

-Dave 2018

Continue reading “10 Ways to Maximize your Living Space”

How to install a GSM/GPS Tracking Module for your car yourself

If you’re ready to put a tracker in your vehicle but maybe you do not have the $20K+ to fork out initially, or do not want to add a new bill for yourself to pay each month; then you have come to the right place. This post will show you how to install the device yourself professionally.

The device we will use is the TK103A/B GSM/GPS Tracker. Accessories included in the box:

  • GPS Antennae
  • GPRS/GSM Antennae
  • 12V/40A Automotive Relay
  • Remote Controller
  • Cable Harness
  • Microphone
  • Manual


Other materials/tools used:

  • 5-20Ft 18AWG 2 core cable
  • Electrical Tape
  • Cable ties
  • Socket Wrench
  • Wire stripper
  • DC Voltage Circuit Tester
  • Digital Multimeter
  • GSM SIM Card


Step 1: Buy a SIM card

sim-cards-banner-image.png

Buying a SIM card (uncut) for this device is the first step because after the device is installed in the car, it’s not so easily accessible. Also, if using Digicel its important to set up the SIM with the MyDigicel App; and if using Flow install the My Flow Self Care App. This is to enable you to monitor the SIM balance as well as top up when necessary.


Step 2: Choose a hidden location for the device

Location is everything. If a criminal can find your tracker in your car easily and remove it, all the features of this device will all be for naught. Most automotive electronics are installed within the dashboard area of the vehicle. However criminals also know this because it is common practice and will be the first place they will look. Ideally you want to find a place that is hard to access, unconventional, and is near a 12V supply you can tap off and ground (metal chassis).

Cars typically have two 12v supplies:

  1. Permanently ON
  2. Accessory only (ACC) – ON with Ignition switch

If you want your device powered when the vehicle is off you can tap from a permanent 12V supply (recommended).

However if you are concerned about the current draw on the car’s battery (especially if the car is inactive for long periods), you could either install a switch in series or connect power to ACC 12V (Turns off when ignition key out).

The current draw is relatively low, from my measurements, the current draw is roughly 60mA. If you use your car everyday this shouldn’t be a big concern since the alternator will recharge the car battery.

You could also run a circuit from the car’s fuse box, but the last thing you want is to have a long wire between your device and car’s fuse box revealing the tracker’s location.


Step 3: Installation and Setup

TK103 wiring diagram
Car GPS Tracker – TK103 wiring diagram


The above shows the wiring diagram for the device. For simplicity I will only be using the device for tracking and remote engine shutoff (immobilizer). So the only cables I’m interested in are the red (12V), black (ground), and yellow (to relay). This post will focus primarily on set up of the location monitoring. The other features I will not use because I don’t need them and it will force me to install at the dashboard.

For first time setup, insert the SIM card, using something fine to insert into the SIM card popup switch.

tk103 front 1


Connect the positive (red) and negative (black) to your vehicle’s 12v and ground respectively and wait 1 minute before turning on the backup battery switch.

tk103 front 2

Note the indicator light colours

GSM/GPS LED Indicator

  • Red LED indicator ON: No GSM network signals.
  • Red LED indicator flashes fast (one time each second): GSM Network
    signal is normally, and tracker works under GSM mode.
  • Red LED indicator flashes slowly (one time each three second): Tracker
    works under GPRS mode.
  • Green LED indicator on: GPS signal is normal.
  • Green LED indicator off: No GPS signals.

Note that if the GPS and GSM antennas ideally require line-of-sight with the sky to operate. It can still function concealed beneath thin materials (metal or plastic).

If your device is stuck on red after several minutes it may mean that the antennas are not getting a clear signal and may have to be relocated.


Step 4: Configuring device settings

To utilize the features of the tracker, commands are sent to it via SMS. The manual lists all the available commands but I’ll highlight some important ones.

Initialize:

Using your main cellphone, send SMS “begin+password” to the unit, it will reply “begin ok” and initialize all the settings to default factory settings.(default password: 123456)
For example: send SMS “begin123456”, it will reply “begin ok”. (No
quotation marks“” when sending all the SMS)


To Change Password:

Send SMS “ password+old password+space+new password” to the unit to change the password.
For example: send SMS “password123456 888888” to the unit. If succesful, “password ok” will reply to your cell phone from the device tracker.
Authorization:
Send SMS “admin+password+space+cell phone number”
to set up an authorized number, the other authorized numbers should be set
by the first authorized number, if the number is successfully authorized, the
unit will reply“ admin OK” by SMS.


To get location:

Dial the tracker device from the authorized number, it will hang up
your calling and respond to a real-time latitude and longitude information
as following:

Screenshot_20180222-215544

Now you can rest easy knowing you have a means to monitor the whereabouts of your vehicle anywhere.

Stay tuned for part 2 of this series where we install the immobilizer system and make it wireless.

-Dave 2018


Continue reading “How to install a GSM/GPS Tracking Module for your car yourself”